On the second week we designed our own backpack. To design our own backpack we had to think of the problems that we had with our backpack now. My problem with my backpack is that my backpack was too heavy, carrying it around school the whole day makes my back tired. To solve my problem I drew a design of a hover backpack. After I designed my backpack I had to get a partner and share my creation with them. When I was learning about my partner's backpack, I had to take notes because I only had 5 minutes to make my partner's backpack. We had to share our prototype with our partner, learn about our mistakes and the next day, we got 15 min to make a second prototype. We shared our second prototype with our partner, my second prototype was way more accurate then my first.
My Partner's Ideal Backpack: Tom
1. Empathy: We had to find a partner to share our ideas about our backpack. When we were sharing our back ideas with our partner, it was kind of like an interview. In the interview we had to ask questions about his/her backpack and take notes about it. We only got 3 min to interview our partner. In the interview my partner and I shared our ideas through the stretch of our backpack. At the end we had to answer questions about what was the main point of our partner's backpack in complete sentences.
2. Define: My partner Tom needs a way to carry all his gadgets in one backpack because he saw a show, where the military had a hard time to get their gadgets out. My partner wants a way to help the military access their gadget easily.
3. Ideate: After learning about my partner's bag, I thought of ways to make his bag better. My partner's bag had the main point but there is always more ways to be organized. To make the bag more organizes I was think that the bag should have a small pocket at the front of the bag, to make a pocket knife easy to access. I was also thinking that there could be different compartments to hold supplies for different kinds of severe weather. In one area in the bag there would be the main supplies to prepare for a snow storm. In the snow storm area there will be boots to go through snow, googles to protect your eyes from snow, a tight jacket to keep you warm, and earmuffs to keep your ears warm. The snow storm area isn't the only weather preparedness area, there is also the hiking area. In the hiking area there is hiking boots to make hook onto the dirt when you are climbing a mountain. There is flags to help mark the trail when you go up the mountain to remember the way back down. There are extra water bottles, a hat, and sunscreen if it gets extra hot when hiking. When the military has to go on a mission they might get lost, so I will have a pocket on the side of the bag to hold a gps, and a camera to take pictures of evidence when they get to their destination.
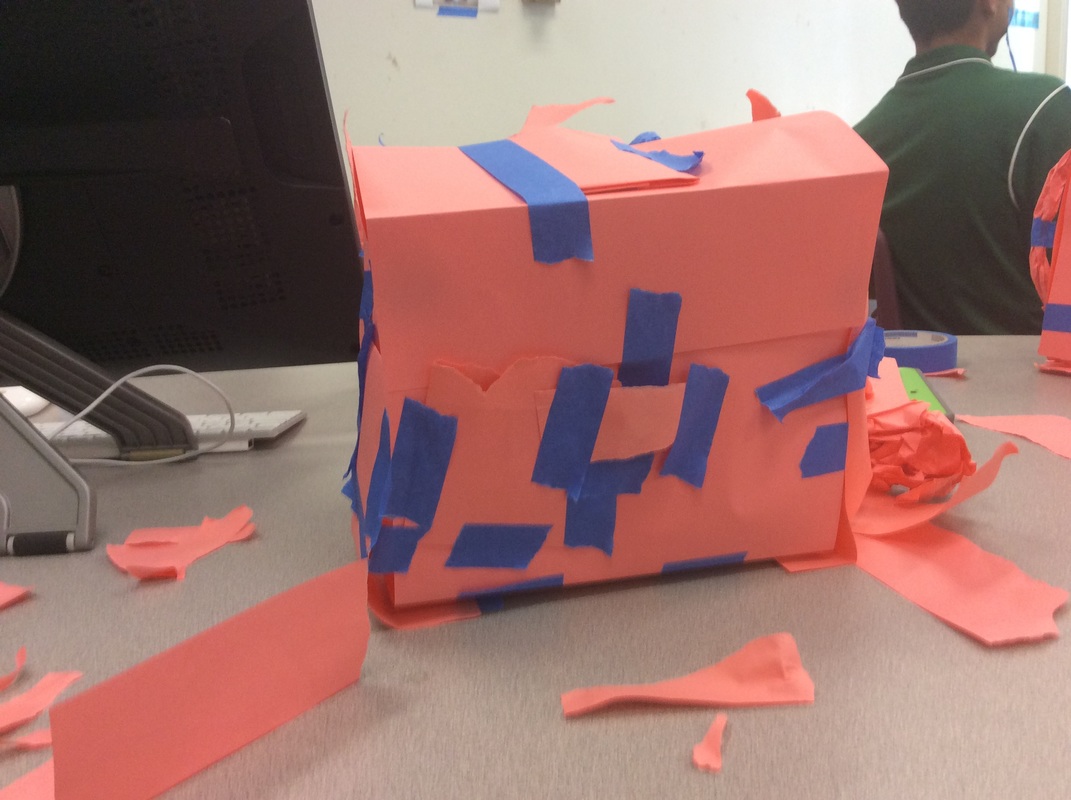
4. Prototype #1: I only had 5 min to create a prototype. I got my ideas while I was creating my prototype. In the end I used 4 pieces of paper. I got two pieces of paper and bent the paper 3 in from the edge. The I got the two pieces of paper and put the bent part together, creating a 3 in bottom. After I put the tow pieces of paper together I taped the bottom. I got another sheet of paper and ripped it in half. After I ripped the paper in half, I stood the tow big pieces of paper up. I taped the half paper to the sides of each of the big pieces of paper. Once I taped the half paper to the sides of each big paper, the bag had one side covered. I grabbed the other half piece of paper and taped it to the other sides of each big piece of paper. Now the bag was all covered except the top. The top I used one whole whole of paper and bent the middle of the paper 3 in, to make a 3 in rectangle to go across the top of the bag. Half of the paper was behind the bag, and the other half of paper was in front of the bag. I taped the top to the back and front of the bag. I only used one piece of tape for the front to make the tape look like a latch.
2. Define: My partner Tom needs a way to carry all his gadgets in one backpack because he saw a show, where the military had a hard time to get their gadgets out. My partner wants a way to help the military access their gadget easily.
3. Ideate: After learning about my partner's bag, I thought of ways to make his bag better. My partner's bag had the main point but there is always more ways to be organized. To make the bag more organizes I was think that the bag should have a small pocket at the front of the bag, to make a pocket knife easy to access. I was also thinking that there could be different compartments to hold supplies for different kinds of severe weather. In one area in the bag there would be the main supplies to prepare for a snow storm. In the snow storm area there will be boots to go through snow, googles to protect your eyes from snow, a tight jacket to keep you warm, and earmuffs to keep your ears warm. The snow storm area isn't the only weather preparedness area, there is also the hiking area. In the hiking area there is hiking boots to make hook onto the dirt when you are climbing a mountain. There is flags to help mark the trail when you go up the mountain to remember the way back down. There are extra water bottles, a hat, and sunscreen if it gets extra hot when hiking. When the military has to go on a mission they might get lost, so I will have a pocket on the side of the bag to hold a gps, and a camera to take pictures of evidence when they get to their destination.
4. Prototype #1: I only had 5 min to create a prototype. I got my ideas while I was creating my prototype. In the end I used 4 pieces of paper. I got two pieces of paper and bent the paper 3 in from the edge. The I got the two pieces of paper and put the bent part together, creating a 3 in bottom. After I put the tow pieces of paper together I taped the bottom. I got another sheet of paper and ripped it in half. After I ripped the paper in half, I stood the tow big pieces of paper up. I taped the half paper to the sides of each of the big pieces of paper. Once I taped the half paper to the sides of each big paper, the bag had one side covered. I grabbed the other half piece of paper and taped it to the other sides of each big piece of paper. Now the bag was all covered except the top. The top I used one whole whole of paper and bent the middle of the paper 3 in, to make a 3 in rectangle to go across the top of the bag. Half of the paper was behind the bag, and the other half of paper was in front of the bag. I taped the top to the back and front of the bag. I only used one piece of tape for the front to make the tape look like a latch.

Caption: Prototype One = This prototype was made out of 4 pieces of paper and tape from 5 min of work time. The experience was stressful but in the end the bag was a success.
5. Feedback/Test: Since I only had 5 min I didn't get all the details done. My partner's bag was suppose to be a bag to easily access gadgets. There is suppose to be an oxygen tank on the side of the bag, so when you go on a mission underwater, you can still breathe. Connected to the oxygen tank is suppose to be a tube, connected to a mask. The oxygen is suppose to flow through the tube into the mask, to let you breathe. In the back of the bag I didn't have time to add straps to the bag. The straps are suppose to be strong, so when you have a lot of heavy equipment in the bag, the bag wouldn't break. Another thing I could add is more pockets, to carry more gadgets. The pocket could be in different sizes for different size gadgets. There could be a pocket on another side of the bag, to carry a water bottle.
Iteration: After we got feedback from our first prototype, we tried to make another improved prototype.
6. Prototype #2: When designing another prototype we now got 15 min to design another one. During this prototype designing I got my ideas from looking at my feedback. My goal was to have the same box design for the base, like before but add the straps, and more pockets. In the end my bag looked like the same before. When it was time to add the straps, I got a big piece of paper, and ripped it in half. Once the paper was in half, I bent the paper in half making it look like a long rectangle. I taped one side of the rectangle to the bottom of the bag, then I taped the other side of the rectangle, to the top of the bag. The strap was in an oval shape, connected to the bag. I added a small pocket in the front, allowing easy access to a pocket knife. I added a pouch in one side of the bag, allowing easy access to a water bottle. On the other side of the bag I added a oxygen tank to help do missions, underwater. I added a top pocket to allow easy access to rope, to make missions that involve a mountain, easier. Overall the second prototype was more detailed than the first prototype, but I still lost track of time.
7. Feedback/Test: My partner was way more happy with my design of my second prototype compared to my first. The thing my partner most focused on was the oxygen tank. My partner liked how the oxygen tank was connected to a small tube and a mask, to represent oxygen flowing through the gear. He said the oxygen tank was so detailed that he could easily tell, what the gear was. Another thing my partner liked was the straps. The straps made it easier to carry the bag and grab the bag quickly, if you needed a fast get away. The last thing my partner liked was the water bottle pitch. Without the water bottle pouch, you would have to carry the water bottle by hand, causing an extra thing to carry. Something my partner said that I could add is a have more pouches in the bag, to separate gear. The partner said that there should be two pouches in the bag. One pouch should carry gear for mission that are super cold, like jackets and googles to keep you warm. The other pouch would carry the gear for warm missions, like sunscreen and hats to keep you cool.
Caption: Prototype 2 = This is a picture of a bag that is made out of about 7 pieces of paper and tape in 15 min of work time. In this process of making the prototype I was a bit more relaxed than the 5 min prototype. I took my time to add more details to my bag. In the end the 2nd prototype looked better with the pockets and straps.
Designing BAckpack Packet of Thoughts
 Caption: Title page of design thoughts of bag |  Caption: The design ideas for bag |

Caption: Changing page to a design thinking approach

Caption: Notes on discussing ideas of our partner's design for their bag

Caption: Gathering notes about partner's bag and summing the information up in one statement

Caption: Improvement ideas of our partner's bag

Caption: After building prototype we write down what things we had time to build, and what things you can add to the bag for next time.

Caption: This is the reflection of the thought process and experience of designing our own bag.
 RSS Feed
